
From a vague bug report to a brief worth handing over
One worked example, start to finish. Checkout fails for some people, nobody knows why, and you want an assistant with the repository open to read the code rather than invent a plausible theory. About ten minutes, in ten steps.
Your notes
checkout 500s for some people
started sometime last week maybe?
probably the payment service
we deployed on Tuesday
does it happen on staging
no test covers the retry pathThe map
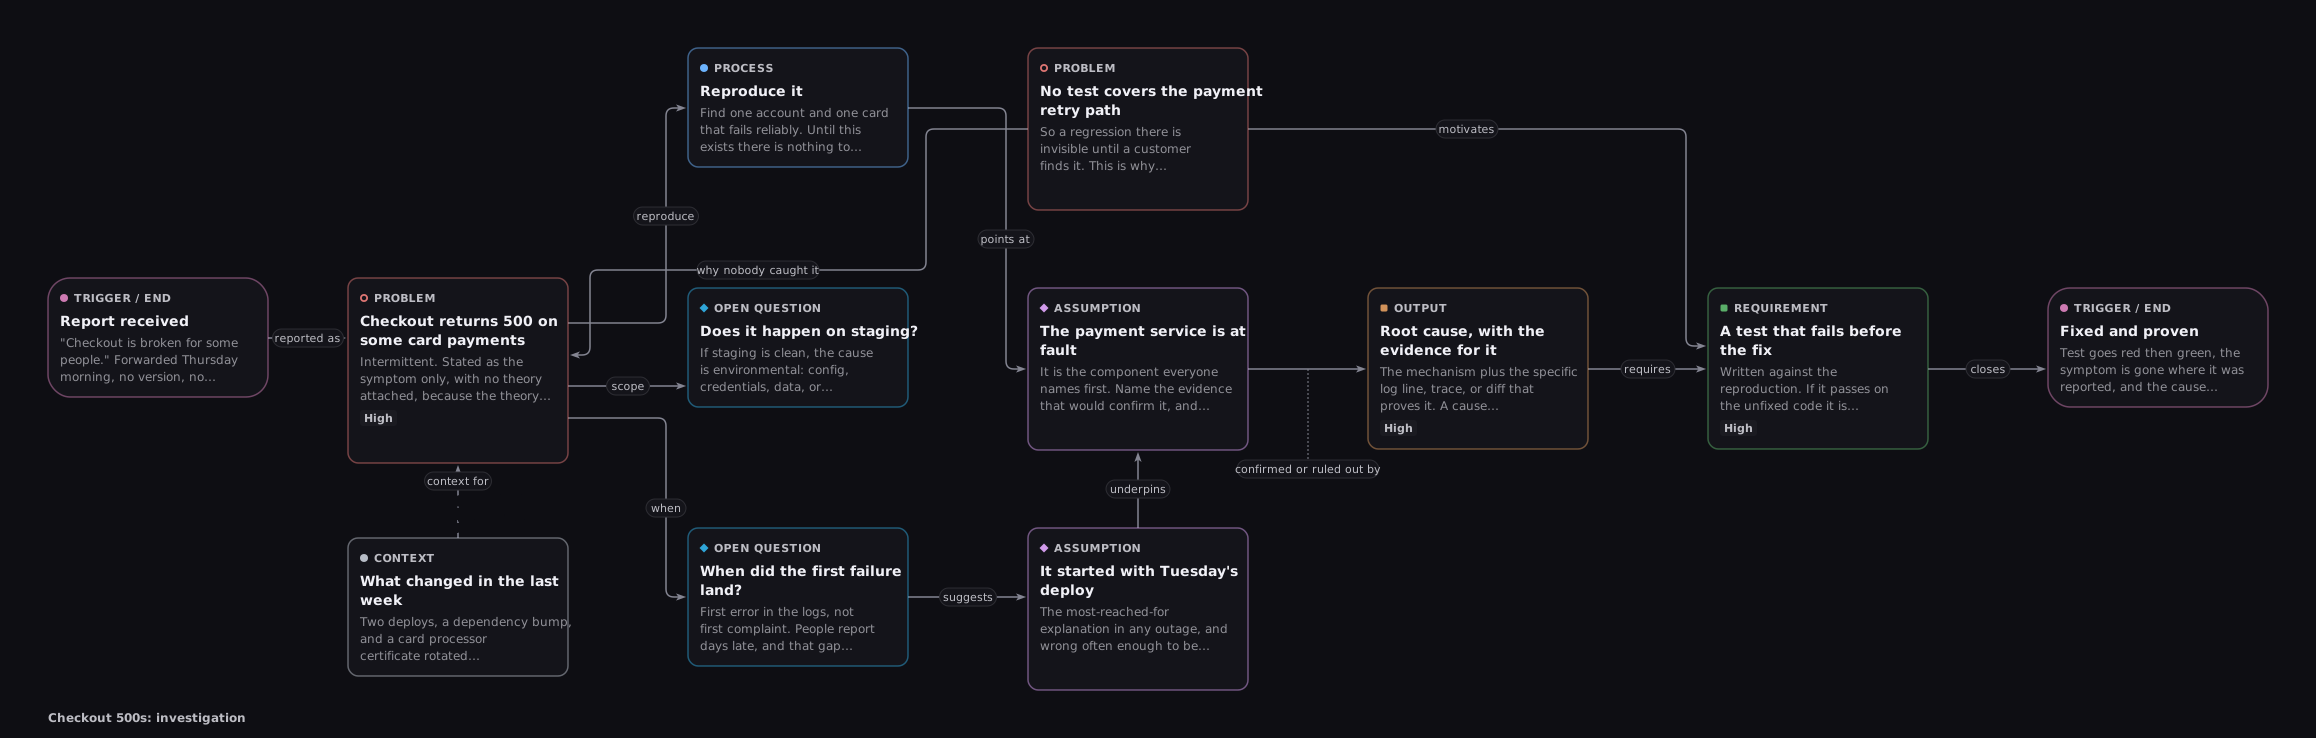
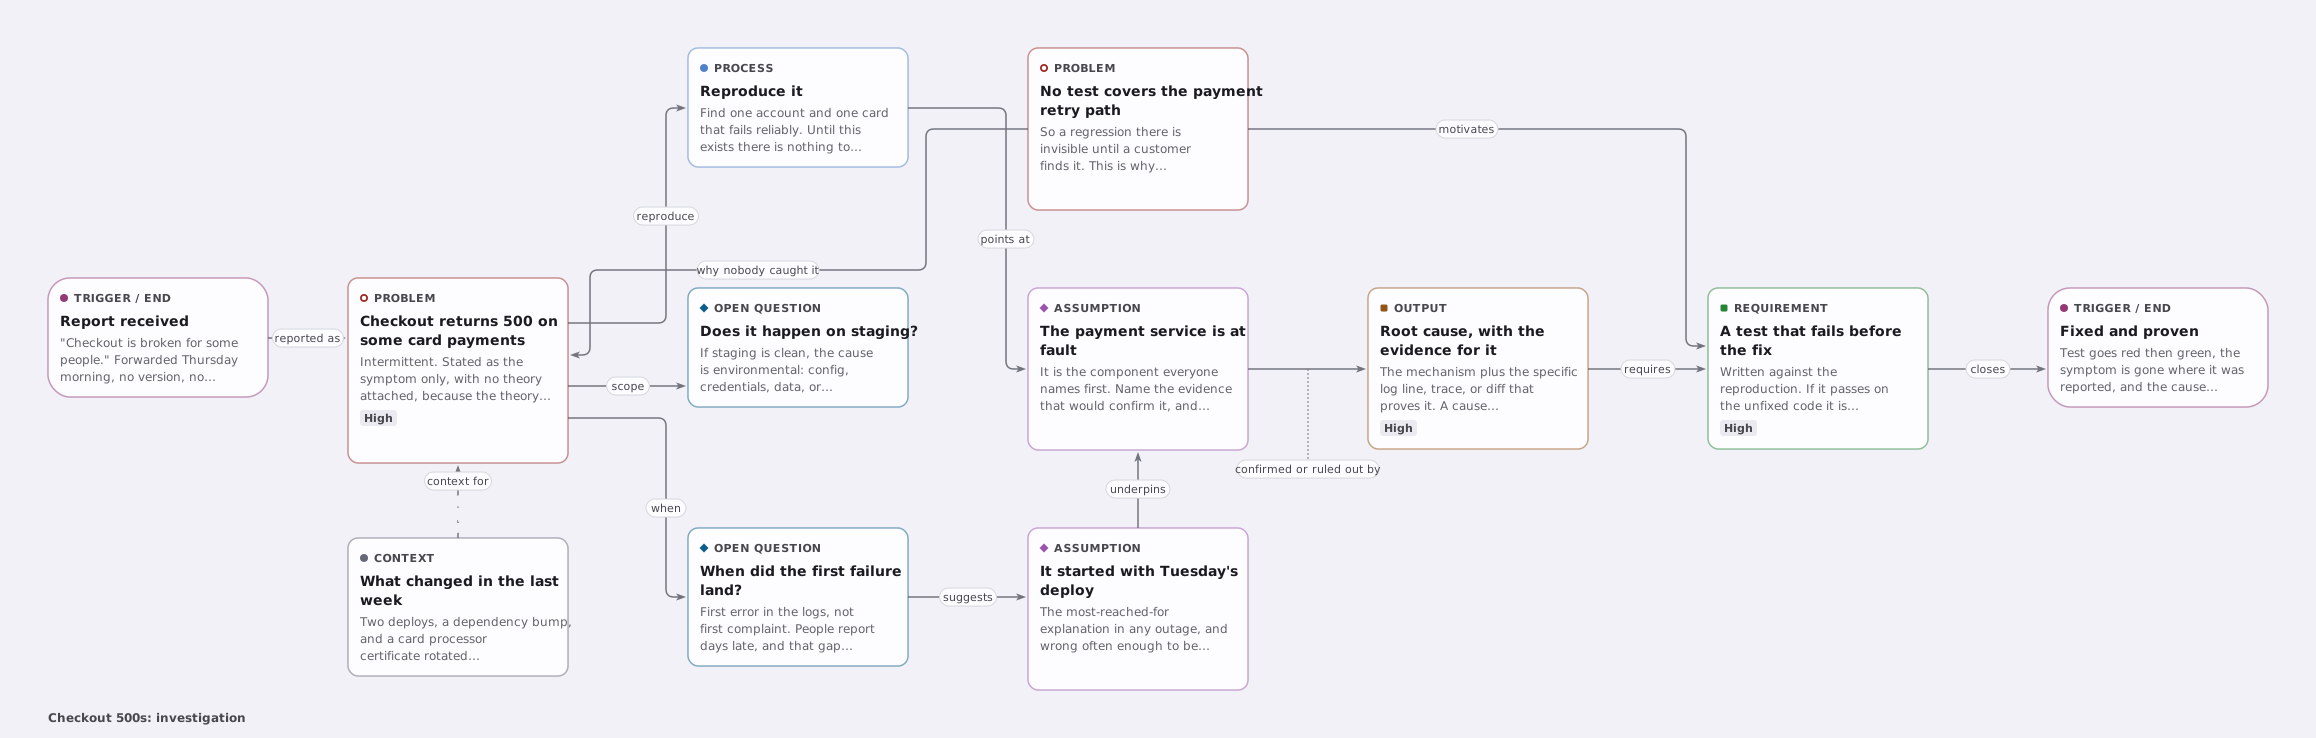
Its main row. Scroll sideways, or open the picture for the whole map.
The brief
## Situation
- The relevant repository is open to you.
## Task
Investigate. Establish what is actually true before anything is changed or proposed.
## Assumptions (validate before building)
• It started with Tuesday's deployStep 1. Say where you are standing, before you draw anything
Open the Brief tab in the right panel, open Framing and set the Situation first. Four choices, about fifteen seconds:
- Codebase: This repo. The code exists and the assistant can see it.
- Running in: Claude Code. It has file and shell access.
- Start by: Reading the code. Before any theory.
- Boundaries. One per line. Here:
Reproduce before theorising.
They become the first lines of the brief, so you can read what you are about to hand over (each line cut short here, at the dots):
## Situation
- This is a planning canvas exported from Pathfinder. It is a plan, not a ...
- The relevant repository is open to you. Read it before trusting this ...
- You are running in Claude Code with file and shell access. Prefer ...
- Start by reading the code. Reconcile it against this canvas and report ...

### Constraints and boundaries
- Reproduce before theorising
Change Codebase to None yet and the same map tells the reader that nothing in it can be checked. Same blocks, opposite instruction: that is why this section comes first.
Step 2. Get the mess out of your head
An empty map opens on a start panel. Choose Paste your notes (or press 1) and write one idea per line, no formatting, no thinking about types:
checkout 500s for some people
started sometime last week maybe?
probably the payment service
we deployed on Tuesday
does it happen on staging
no test covers the retry path
Press Turn into blocks. Each line becomes a typed block. Where a type was a guess, the card's type label carries a small caret: click it, or press T on the card, to confirm the type or change it.
When you already know what a line is, say so: start it with Problem:,
Assume:, Risk: or another prefix the panel lists, and that
type is used as written. End a line with ? to make it a question.
Later, add one block at a time: N then a letter adds that type where you point (N then K a risk, N then Q an open question), and the palette shows each type's letter beside its dot. ⌘/Ctrl+K finds any action or block by name.
The shortcut for this exact case is the Investigate a bug template (Start from a template on the start panel, or the palette): thirteen blocks, arranged, with the situation set to match. Delete what does not apply.
Step 3. Separate what you know from what you assume
This is the step that earns its keep. "Probably the payment service" is not a problem and not a question: it is a belief you are about to act on without checking, which makes it an Assumption. The brief treats the three differently:
- Problem: the observable symptom, without a theory attached. Checkout returns 500 on card payments.
- Assumption: a belief nobody has checked. It started with Tuesday's deploy. The brief asks the reader to pressure-test it, and to settle it from the code when the repository is open.
- Open question: a genuine unknown. Does it happen on staging? The brief tells the reader that guessing here is how the plan goes wrong.
Select the block and change its type to Assumption in the inspector. A question you have been treating as settled has its own button there, Treating this as true? Make it an Assumption.
Step 4. Connect them, and say why
Drag from the dot on a block's edge to another block, then select the line and give
it a label: depends on, blocks, enables,
mitigates and more. An unlabelled line says two things are related; a
labelled one says how, and the brief carries it through as the dependency order.
Connections route themselves around other blocks. If one leaves from an awkward side, drag its endpoint handle onto the side you want, or pick the sides in the inspector.
Step 5. Press Tidy
L, or the Tidy button. The map is rearranged into layers along the flow, connections are re-pointed to match, and the toast says how many crossings are left. The caret beside Tidy picks left to right or top to bottom. It is one undo step: ⌘/Ctrl+Z puts every block back.
Tidy is also a diagnostic. If the result is a straight line with everything dangling off one node, the map has one real idea in it and a lot of decoration.
Step 6. Read what the tool is telling you
A block with a gap wears a dashed amber ring and a badge on its corner; hover or focus the card and the badge names the gap. A block connected to nothing usually does not belong, or the thought is unfinished. An assumption not anchored to a goal or a requirement is one nobody has said why they care about.
The Attention tab lists every gap, and a gap you mean to keep can be accepted there or in the inspector. The Brief tab counts what is still open before you copy anything: a thin map makes a thin brief. On a map bigger than the window, M shows the minimap and Shift+1 fits all of it.
Step 7. Pick what you want back
The mode at the top of the Brief tab reshapes the whole document, not a header line:
- Investigate: establish what is true, with evidence for each finding; unknowns stay marked and disagreements with the map get reported. The right mode here.
- Explore: pressure-test the map itself. Gaps and questions, no solutions.
- Plan: a phased plan with outputs per phase.
- Build: requirements as a task checklist, once the plan is settled.
- Clarify: questions only, ranked blocking first.
Step 8. Hand it over
Copy brief at the top of the Brief tab (⌘/Ctrl+Shift+C), in the bar under the canvas, or under File, Copy. Every one copies the scope chosen beside it: the whole map, or only the selection. After the Situation, the brief opens on its task:
## Task
Investigate. Establish what is actually true before anything is changed or
proposed. Work outward from the problems and open questions below.
Then the blocks, grouped by type, with the connections as a dependency list. The assistant knows what it is holding, what it can reach and what to do first, before it has read one of your boxes.
Step 9. Before you present it
A map you are about to walk somebody through has a different job. Select the blocks that carry your point and give them a Highlight: Alert for the thing to look at first, Focus for what you are discussing. Right-click a block and use Select to take every block of its type at once. Then turn on Spotlight in the View menu, which fades everything you did not mark.
Highlights say "look here" and nothing more. They travel with a share link and reach the image export, but stay out of the brief: the type already says what a block is.
Step 10. Bring the answer back
An investigation that ends in a chat log is one you will run again in three weeks. Use Bring the reply back at the end of the Brief tab: choose Paste a reply, paste the whole reply, and the patch the brief asked for is previewed and applied as one undo step. By hand:
- An answered question gets its answer in the inspector. It travels with the map and shows up in the next brief.
- A settled assumption becomes a Decision: change its type, and its connections stay. Put the evidence in Rationale; if it was false, rewrite the title to say what is true.
- Something discovered becomes a block wired to whatever it affects.
Now the map is worth more than when you started, which is the only test of whether a planning tool was worth using.
Other formats
- File, Export, Download Markdown: every block type as a section, connections with their labels, and a Mermaid graph.
- File, Export, Download JSON: the whole map, situation included. The one to hand a terminal session.
- Share, Copy link: the entire map encoded in the URL. Nothing is uploaded; the link is the data.
- The other direction: File, Copy, Copy a prompt that builds a map has any assistant build a map from your description; import the JSON it hands back.
- Examples: four finished maps, from this bug investigation to a recurring report.
- llms.txt: the format spec, if you would rather generate maps than draw them.